Showing posts with label DIY. Show all posts

Tuesday, December 8, 2015

Bridal tutorials: DIY birdcage wedding veil + jeweled sash belt

'Tis the season for doing DIY projects at home! It took me a little while but per your requests, here's a tutorial for the DIY blusher birdcage veil and embellished sash belt I wore on our wedding day. You can also make thinner versions of the sash belt with smaller pieces of appliqu� to dress up bridesmaid looks. For those not in wedding mode, perhaps try your hand at one of my tutorials for a holiday tulle skirt, a regular A-line skirt, or a foldover clutch using festive materials!
In video: Anthropologie dress (old; from this post), Baublebar necklace in gold

I made my own bridal accessories in order to get exactly what I needed (my gown was a slightly hard-to-match champagne color), and ended up saving quite a bit in doing so. The belt is so easy it doesn't even warrant a tutorial! The veil will require a little patience, but I still think it's suitable for beginners with little to no sewing experience. I considered a variety of veils and went with birdcage for the vintage-inspired look, and also because the simplicity balanced out the volume of my gown.
Birdcage Veil Bridal Jeweled Sash Belt Wedding DIY Tutorials

I also re-wore both of these accessories with my reception look:
wedding champagne reception dress aidan mattox
Aidan Mattox gown sz 0 hemmed (color sold out), BP luminate sandals

I've listed where I got all of my materials at the bottom of this post, but you should be able to find similar at any of your local fabric or craft stores.
wedding recessional lazaro lace gown boston library
Lazaro 3415 gown sz 2 with hollow-to-hem & skirt volume reduced, vintage earrings (similar)

And of course the only clear closeup photo I found of both accessories is this goofy shot with our mini ice cream cones : )wedding mini ice cream cones

Belt Supplies: 
- Ribbon or material of your choice for the sash. I used a 1.5" wide grosgrain ribbon cut to about 100" long (I liked long tails for draping over the back of my dress)
- A piece of embellished appliqu�. Lots to choose from if you search online! Mine is a 7" long iron-on one from The Bright Shop - the exact one is no longer available, but she mentioned a super similar one will be in stock when her shop re-opens in early January. You can go for a longer appliqu� to cover more of your waistline (I wanted to do this but ran out of time to order more appliqu�), or arrange together several smaller pieces.
- Clear nail polish 
- Iron & ironing board, and/or needle & thread

Veil Supplies:
- A small haircomb - these come in either plastic or wire
- 1 yard of Russian veil netting. I got 1 yard of the 9" wide champagne color from Benoir's Closet to match my gown. She also sells white, ivory, and several other colors.
- Needle & thread

There are actually several places on Etsy or eBay to order an inexpensive birdcage / blusher veil already made - however, I bought one and it arrived in the mail so misshapen that I couldn't revive it despite my best steaming and ironing efforts. Making one ensured that the poof would be nicely shaped, plus you can use wider or narrower netting if you want to customize more or less coverage on your face.

I had my florist create a floral comb with fresh flowers (here's my simplified tutorial) which I layered on top of my birdcage veil comb. This helped conceal any rough edges from my DIY work, and also dressed the piece up more. Please feel free to share this with any friends getting married, and please let me know if you end up trying it yourself!

For previous wedding-related posts: You can read about Nick's proposal, our engagement photos in Paris, garden party bridal shower, Chinese marriage tea ceremony, and our wedding day!

Wednesday, October 28, 2015

Fall staples + how to get hats to stay on your head

black grey brown fall outfit FSJ.Brand Maria jeans "vanity" sz 24 hemmed, Bobeau cardigan sz XSP "light grey"
BP Trolly booties, Talbots tee (also worn here), Hinge wool hat in "heather camel"

I sometimes hear pairing brown with black (also navy with black) as a "don't" and can't imagine why! I think the two work together harmoniously, which inspired this outfit comprised of four of my favorite neutrals. This is my second Bobeau cardigan and the "light grey" knit is a heathered one that goes with everything. I've gotten some questions on the differences between Bobeau's regular fleece cardigan (which I've shown often in "mink") and their fuzzy which I have on here. The regular has a smooth outer and is lined in a traditional fleece material as most of us know it, while the fuzzy fleece is a thinner knit material that is smoother on the inside and with a very fine fuzziness on the outside that feels suuper soft and not really fleece-y. I found the fuzzy to run a little tighter in the arms thus sized up one.
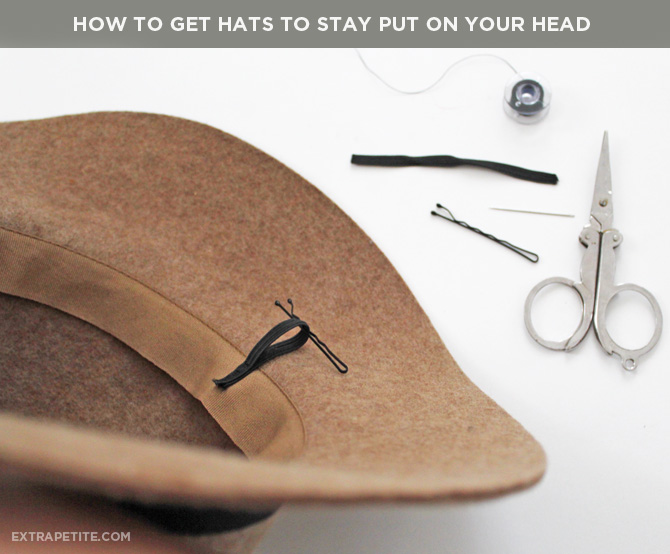
How to get hats to stay on your head bobby pins
This outfit prompted me to also share a little tip I've been using to keep hats secure on your head! After having one too many gusts of wind leave me chasing after a hat, I came up with these super easy hairpin loops made of thin elastic. Simple sew two (one near each ear) pieces of elastic by hand into the interior of a hat band, and use them as loops to secure bobby pins to. If needs be, seal the cut edges of the elastic with clear nail polish to prevent fraying. I am slowly in the process of adding these to all my hats, especially the lightweight ones from summer!

Sizing-wise, this hat is more generously sized, but I kept it out of several I tried because it actually encases most of my head and keeps it warm. I've been using it more as a functional rather than fashion accessory (rumples hair up much less than knit hats), but it doesn't hurt that it's in a cute panama shape. If you have a hard-to-fit head, I've mentioned before on IG that H&M has sized hats in S/M/L and the S fits pretty small (I'm a M there).
black jeans grey sweater fall outfit
Black skinny jeans are high up on my fall/winter staples list, as they're so flattering especially with booties. Nordstrom has a big selection at all price points starting in sizes 23 / 000, and I like to filter by size plus "ankle" length for ones that may require no alterations on shorties. The J.Brand "Maria" cut is an old favorite of mine despite a regular length that did need to be hemmed. It's a high-waisted style that fully covers my lower belly, which some may be averse to but in my older age I love how it holds everything in and flattens that area. The material of these in "vanity" is a substantial-weight denim (please note that I've found materials to be quite varied based on the color code, even within the same style from the same brand). Color is a regular black, not as jet black as these photos depict.

If you're looking for more of a jegging, I love the feel of CoH's popular legging jeans in "axel." I remember a while back I was sick in bed and less than enthused about getting dressed for an event. I was staying with a friend, who loaned me her "axel" jeans and I couldn't believe something so stretchy, soft and comfortable could look reasonably formal! I like my ankle area to be super skinny however and these have a slim but slightly wider opening than my J.Brands. A sz 24 in the CoH's fit well everywhere except length, so I didn't find them to run small like the item listing notes.
black jeans grey sweater fall outfit2
Thank you to Nordstrom denim for sponsoring this post!
black jeans grey sweater fall outfit1
PS - restock alert - my wool blend plaid scarf from this post is now all sold out on Sole Society, but I noticed Nordstrom just got stocked the "hunter green" one I have!


Friday, August 21, 2015

Flower crown & comb DIY tutorial (bridal shower activity)

bridesmaids flower crowns
On me: Asos petites dress (more sizs re-stocked) from this post
On my beautiful bridesmaids: from left to right, dresses are H&M, Zara, Lulu's, and ASOS

I got a number of messages last month on both these flower crowns from my bridal shower as well as the floral comb hairpiece in this post - not only are they a fun DIY for all ages, but also make pretty photos for memories. For my actual wedding day, I had my talented florist (Boston Pollen) make all the hairpieces so we wouldn't stress about them the morning of, plus our arrangement skills really can't compare. For the shower though, I loved seeing friends and grandmothers alike crafting and laughing over (some were notably more talented than others ; ) their creations. Read on for the simple materials & steps...
DIY flower crown floral comb tutorial header

You will need:
- fresh flowers, in an assortment of A) medium-sized "centerpiece" flowers like small roses, ranunculus, etc. B) smaller filler flowers, and C) small-leaved greenery. Grocery stores can provide very cost-effective options - most of ours were from Trader Joe's at their bargain prices for fresh flowers!
- covered wire (to mimic the look of twine) and floral tape. I got both of these at JoAnns, but should be available at most large craft stores or Amazon.
- scissors and wire cuttersDIY flower crown floral comb tutorial bridal
Step 1: Measure and cut pieces of covered wire based on head size, adding about 4 inches for overlap. Twist the two ends of the wire together to secure a circle.

Step 2: Cut flower stems to about just 1" long. Next, plan out your arrangement with a mix of medium flowers, small flowers, and greenery. You can then layer the pieces on and secure with floral tape one by one as shown above. That's it!

Or, as a shortcut, you can arrange the flowers in a criss-crossed manner and then secure them all in one bunch to the wire using floral tape, as shown below.

Please note: floral tape is not like regular tape and doesn't have a sticky residue. It adheres to itself, which is why you need to layer it on by wrapping it a few times around whatever you're trying to tape together.
bridesmaids flower crowns1

DIY flower crown tutorialWe also made a few fresh floral combs for fun - these are much more subtle than a crown, and make for pretty hairpieces in a variety of hairstyles. I wore mine off to the side with both a full updo as well as my hair down, and each of my bridesmaids had different hairstyles incorporating floral combs.

Simply get blank plastic or wire combs from the craft store, and secure flowers on by looping the floral tape in and out of the comb's teeth.
DIY flower crown floral comb tutorial bridal2Please note, fresh floral hairpieces usually will not last more than a day, especially if hot sun is involved, so they can't be made too far in advance. Hope those of you who requested this tutorial give it a try and have fun!

Sunday, December 28, 2014

Tutorials: DIY shoe clips + no-sewing needed clutch purse

Last week I had a fun opportunity to be on Meredith Vieira's talk show sharing a few fashion DIYs for Christmas. I know it's past Christmas, but I love a good at-home project any time of the year! These two were my favorites and are easy enough for the craft-challenged and even for doing with kids. For anyone interested, I included a recording from the TV segment at the bottom of this post.
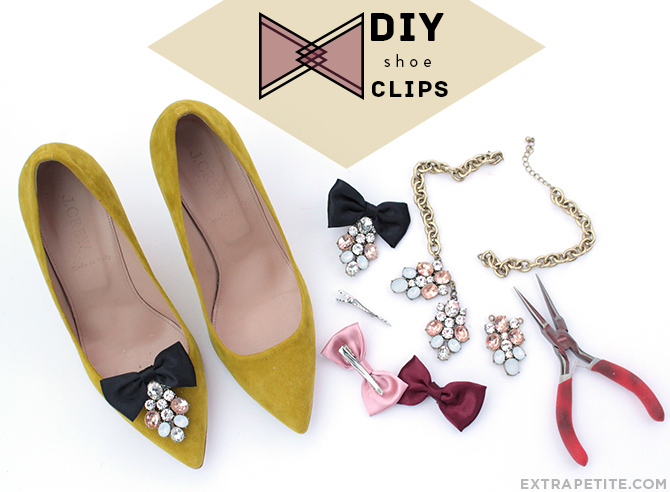
DIY shoe clips tutorial header
DIY # 1 - I first came across the concept of shoe clips with my vintage bow ones from eBay, and soon realized how easy they were to make. Apparently in the olden days these were pretty common, and I don't understand why they're no longer popular! You can easily change up the look of plain shoes or mix and match designs to your heart's desire. The clips can go on the front part of the shoe, the back behind the heel, on the side, on the ankle strap, etc...quite a few possibilities.
DIY sequin clutch header
DIY # 2 - The other item the show producers asked me to demonstrate was a clutch purse, which I posted a tutorial of here (one of my favorite creations ever). However they asked me to simplify it even further so that no sewing was needed, since Meredith is apparently not so great with needle and thread. I scrounged around at home and found an old vinyl makeup pouch and fabric glue, which surprisingly helped create a pretty nice-looking bag. For anyone who owns a sewing machine though, I would encourage sewing based on my old tutorial instead of using glue, since stitches will be more secure over time.

On to the steps for the shoe clips..

Shoe clips materials needed: 
1. Glue. If you don't own a hot glue gun yet, it's a useful little thing to have around for crafts plus is very inexpensive (under $10, especially with those craft store 40% - 50% off coupons). I used one here but if you want it to be really secure, super glue should work - just be very careful.

2. Embellishments. The best part about these is you can use a wide variety of items, such as costume jewelry, old hair bows, over-sized earrings that might be too heavy for your earlobes, etc.

3. Clips. There are blank shoe clips made specifically for this purpose. I took alligator clips from the back of old hairbows since i needed a bigger clip for my large pieces of jewels. NOTE: use smooth clips without jagged teeth to avoid leaving any marks on delicate shoes. I didn't have time to find or buy smooth clips for the show or these photos, but they're pretty easy to find either on old clips or at craft stores. You can also try lining the jagged side with small pieces of felt so that they don't dig into the shoes as much.

Step 1 - remove jewels or bows from their original attachments. I used thin metal pliers (super nifty for repairing costume jewelry) to detach a few gem clusters from this inexpensive Forever 21 necklace, and also snipped off the bows and clip backings from old hair accessories.
DIY shoe clips tutorial 1
Step 2 - If you're using longer clips, use pliers to gently bend the clips into a shape that would lie flat on a shoe surface and feel comfortable up against your foot. These were originally in a curved shape, which I straightened out and then bent the handle grip a bit so it wouldn't dig into my feet. *Remember not to use clips with jagged teeth on delicate shoes**
DIY shoe clips tutorial 4
Step 3 - Generously apply glue to the back of the embellishments and press the clip down firmly until glue is set. I did the gems here first, which would look great alone on shoes, but added the bows for a little something extra.
DIY shoe clips tutorial 3
Here's what the backsides look like post-gluing. My gems here were pretty heavy and I didn't have a lot of time for the glue to set, so I added thin wiring as extra reinforcement in hopes that they wouldn't tumble off during the show.
DIY shoe clips tutorial 2
And that's it! Can't wait to try these clipped on some pointy-toe flats. Here's a few ideas on how to style your clips. I actually wonder why most designer statement shoes don't come with the embellishment as removable for greater versatility.


They also look cute boxed up for gifting!
DIY shoe clips tutorial 5

Next, the DIY no-sewing clutch purse...

Clutch purse materials needed:
1. Fabric. You can purchase scrap fabric on eBay, at fabric stores, or look in your closet or thrift store for old garments made of interesting materials. I'm using a sequin tank top that was so old the fabric lost its elasticity, but made for perfect clutch-making material.

2. Pouch with zipper or sliding closure. You can use an unwanted makeup pouch (mine was from Forever 21 and is still available), pencil pouch, etc. If you are doing a sewing version and your fabric is too floppy to hold a clutch shape on its own, insert a similar pouch inside your finished product to add structure.

3. Glue. I used "fabric fusion" which I had at home, but other types of glue might work similarly.

4. Clips or clamps. I like binder clips for their strong hold.

Step 1: Starting with one side, apply glue to the top of the pouch in a straight line across, right below the zipper. Line up a straight edge of your material and press down. Continue applying glue to the edges and center of the pouch surface and pressing your fabric down a section at a time.
DIY sequin clutch 1
Step 2 - turn the pouch around - this is side #2. Trim fabric so that it's enough to fold over the entire pouch but with an inch or two of material to spare on both the left, right, and upper edge (below the zipper) of the pouch. Fold those sides in so that no raw edges will show on the end result. Apologies for my poorly-trimmed fabric, as I was in a rush.DIY sequin clutch 2Step 3 - Apply more glue along the edges and center on side # 2. Press down the remaining fabric and clamp down with binder clips all around the perimeter. Allow everything to dry overnight, clamped in place.
DIY sequin clutch 3Ta-da! Here's the finished product from my last outfit post:
anthropologie petites floral dress 2
Here's a short video from the episode (my segment begins about 2 minutes in). Their producers reached out just a few days before the show taping, which was in front of a live audience to be aired later in the week. I was so swamped with work my initial reaction was to pass, but am glad I made time for it - my segment was short, but the highlight of the trip was having a dressing room directly across from Justin Timberlake and watching him roam around. Unfortunately I was too busy trying to contain squeals of excitement to ask him for a photo together!

And alternate link here if the video above doesn't work. I know you guys are probably sick of the bridesmaid dress re-styling from this post but they really wanted me to show it, and also provided the dress that I had on. The glitter heel trick was one of the producers' idea, which they instructed me on to demo along with the shoe clips. Hope you guys have fun with these projects!

Friday, December 26, 2014

Teal Floral Twirl

anthropologie petites floral dress 1
Moulinette Soeurs Baikal dress thanks to Anthro petites (hemmed 2-3"; limited sizes left)
Kate Spade licorice heels (similar for less in "gold"), DIY sequin clutch and sash

I hope those who celebrate had a very merry Christmas! I wore this out to Christmas Eve dinner in sunny San Diego (tried to dress it down beforehand with my denim jacket + navy Ferragamo flats) and it's been nothing but flannel PJs ever since. This is one of my favorite finds all year, and I only wish I got to try it on & post about it before sizes were gone in petites (might still be in a few stores). If you are taller, it's still left in regular sizing online plus I saw a few at local Anthro stores.
anthropologie petites floral dress 3
I already did a quick review in a previous post, but the quality of this dress is beautiful in-person (thought it was good for the retail price, but especially great for the current sale price). The material of this dress is a heavier, substantial fabric with a slight sheen to the finish but is not shiny. It's fully lined with metal back zipper, and I loved the attention to detail on the interior too. If this is indicative of typical quality from Moulinette Soeurs (my first time trying the brand) then I'll definitely be keeping an eye out for their other styles in the future.

small details: scallop trim on the lining hem and the ribbon on the inside of the outer hem
anthropologie floral dress
I'm wearing my usual size (00 petite) which fit decently off the rack and was just a little long for my liking (hit me upper-calf). I know it's intended to be a midi-length style, but I got it hemmed to the knees and found it to be more proportionate on my shorter frame for balancing out the full bottom. The cut of the entire dress is very flattering with a swirly, multi-pieced bodice and skirt that follows body movement fluidly. Please note, tailors usually charge differently to hem regular straight skirts vs circle or fuller skirts, due to more material and/or more difficult curved seams to work with. My tailor charged $25, and I know he's on the low end as far as typical pricing goes.
anthropologie petites floral dress 2
For styling, as mentioned in an earlier post I thought something at the waistline to break up the large pattern is key. I added my DIY sash to cinch that area (you can also try any sash that came with clothes, neckties, or gifts or use a large ribbon), and grabbed a sparkly sequin clutch made from an old shirt. I'll be posting a few easy DIY accessory projects before the new year, in case you need a little something to jazz up your NYE ensemble!
anthropologie petites floral dress 4