Showing posts with label How-To. Show all posts

Monday, December 14, 2015

NYE party makeup tutorial // Bronze smoldery eyes

holiday nye party makeup tutorial sequins smokey eyes
Dress the Population Zoe dress XS in "antique gold," plunge front bra (cups run small)

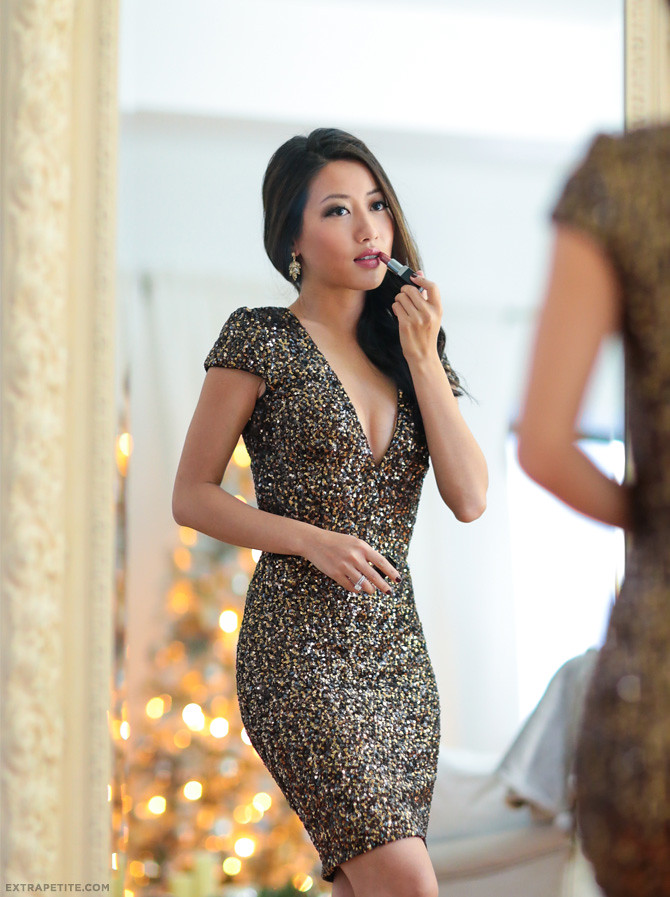
For today's beauty post I'm sharing a more amped up holiday party look with Sephora, which will be perfect for New Year's Eve parties! It's a little dramatic for daytime wear but looks great for a night out and is long-lasting based on the products used. Rather than my usual festive red lip, I went with a more neutral shade to accompany dark bronze smoldery eyes. Sidenote on this sequin dress (here's a similar pretty option w/ higher neckline) - I thought it was a smashing style but wasn't planning on keeping it due to the scandalous super plunge neckline on me. Turns out the V-neck is very easy to stitch up a little by hand to a point you're comfortable with, so I closed it up here about 1 inch. The dress is high quality with thick & sturdy material which helps "hold" everything in, and an XS fit me well.
sephora NYE holiday makeup tutorial
Here's the products I used for today's look...there's some longtime favorites, and also a few new discoveries I've been enjoying. A gift idea I love for beauty-loving friends is to pick a few of your favorite products or palettes and package in a cute, functional makeup bag. I thought this pebbled clutch-sized one (comes in 2 colors) was adorable and can fit quite a bit! Alright, let's get started...
asian holiday party makeup tutorial

Bare faced here, with problem areas including undereye circles and splotchy skin

nars radiant creamy concealer custard asian makeup

Concealer. This NARS concealer is one of my current top favorite products, which came highly recommended to me by a makeup artist. A little really goes a long way, so even my travel-sized tube has lasted me for some time. The formula is very creamy and brightening with good coverage, and blends seamlessly into my skin without looking cakey. You can already see a big difference compared to the bare faced shot. For everyday makeup, I can usually just apply this to my problem areas and skip foundation if I'm running short on time.

While concealer shopping, I was told on more than one occasion by SAs that I should apply eye cream before makeup due to a visibly dry undereye area...yikes! I don't have a go-to one so would love any recommendations!
laura mercier flawless fluide asian foundation

Foundation. I usually dot on foundation with my fingers then buff lightly using a brush in a circular manner. My skin started getting too dry for my favorite powder foundation (MUFE duo mat) so I went back to liquids. I've been toggling between using Bobbi Brown moisture rich and Laura Mercier Flawless Fluide, and sometimes mix the two. I'm not a fan of the Flawless Fluide packaging which gets a little messy by the opening, yet still repurchased just due to the dewy, natural-looking finish and great color match on my skin.

Online reviews for most foundations tend to be all over the place, which is understandable since everyone's skin is different, and how you apply the product can make a big difference. My best suggestion for finding a good foundation is to go into a store and consult a makeup artist, then ask for samples to try back at home!
anastasia contour tutorial asian makeup
Anastasia powder contour palette (also in a cream formula) in "light/medium"

Contour (optional). I'm using my Anastasia contour palette, but you can also use a matte bronzer. I suck in my cheeks and apply an initial streak along the hollows that appear, then draw that color out both upwards (scooping from my temples to around my upper cheekbone) as well as down along the chin at an angle.
anastasia nose contouring asian makeup
For the nose, I use an eyeshadow brush to lightly draw two light lines from each brow down to my nostrils, then blend outwards away from the center.
bare minerals warmth bronzer color asian skin
Face Color. I've gone back to one of my favorite products back when I just started using makeup - good ole' BareMinerals "Warmth." I swear, a little goes far so you'll never run out of this, and I don't see mineral powder going bad. Make sure to tap just the smallest amount onto the lid then swirl with a light and fluffy brush, tapping off the excess. I go a little heavier at the apples of my cheeks, then do a light dusting over the rest of my face and down the neck.

Eyshadow. Be sure to prime your lids for a smokey eye look since it will make a notable difference in the pigmentation and staying power of your shadows. I'm using my everyday staple Laura Mercier caviar eye stick as a base color. I can't live without this thing! A few tips to get the best application: a room-temperature stick will swipe on more fluidly than a cold stick (If needed, I usually warm mine up in my back pocket or bra real quick), and if you want a smoldery line, you have to blend immediately with fingers after applying to your eyelid, otherwise the creamy formula will set.
laura mercier caviar eye shadow stick khaki asian eyes

You can actually continue layering the caviar stick for a full smokey eye, but I wanted to add more dimension and a little more shimmer for the holidays. I patted on a dark taupe eyeshadow (UD Darkhorse) to the outer uppers of my lids, and then a lighter copper brown (UD Half Baked) on the inner corners to brighten up that area. Next, use a small fluffy blending brush and sweep outwards to blend. Lastly, I applied a little black shadow (UD Creep) to the outer corners of my eyes for some smolder.
urban decay naked palette smokey eye
Eyeliner. I love a clean, dark black wing-tipped line to really make the eyes pop. I'm using Stila Stay All Day liner and also love Lorac Front of the Line.

Fill in brows. My brows are the bane of my existence - as you can see from all the pics above, they're coarse, spotty, and grow in all different directions. I've yet to find a good brow person in Boston that makes them look any better. I filled them in here with medium brown eyeshadow, and would love to hear any favorite products from those with similar troublesome brows!
sephora-holiday-makeup eyeliner

Mascara. I mentioned back in this post my eyelash extensions experience, but I haven't gotten refills in a while so they're a little sparse. Typically you should not curl your lashes nor need to apply mascara with extensions on. I'm using Too Faced mascara here which came with one of my eye palettes. I've asked several ladies with amazing lashes what their secret is, and the answer has often been this mascara!
holiday asian smokey eye makeup sequin dress
Lipcolor: Ever since my beloved MAC Charismatic lipstick got discontinued, I've been shopping around for similar, reddish-brown neutral shades that flatter my skin tone. This Smashbox lipstick in "Cognac" is pretty close, with less orangey tones than Charismatic. The formula is creamy and easy to glide on my usually dry lips. I resisted a bolder lip since I went heavy on the eyes here, but think a berry would also be pretty!

Summary of products used, in order of application:
Concealer: NARS' radiant creamy concealer in "Custard"
Foundation: Laura Mercier Flawless Fluide in "Linen"
Contour: Anastasia contour palette in "light/medium"
Blush/bronzer: BareMinerals in "Warmth"
Eyeshadow primer: Urban Decay
Eye colors: Laura Mercier caviar eye stick in "Khaki," Urban Decay Naked palette
Eyeliner: Stila Stay All Day in Black
Mascara: Too Faced Better than Sex
Lip color: Smashbox Be Legendary Lipstick in "Cognac"
Thank you Sephora for partnering on this post!


Tuesday, December 1, 2015

Tutorial Video: everyday curls to easy formal hairstyle (& review on eyelash extensions)


For today's post I wanted to share an updated hair curling tutorial, and also answer some of your questions on eyelash extensions (scroll down below)! After experimenting quite a bit with hair curling over the years, this video shows my current routine for my everyday hair. And for special occasions, I've been too lazy for updos lately so usually just secure curled hair off to the side and add some "poof" up top. What I forgot to mention in the video is that as an alternative look after bobby-pinning the top poof, you can twist all the curled hair into a low side bun and secure with spin pins to get the simple look I wore here - I like that one to show off garments with special back detailing.
ceramic remington hair curling iron tools
I'm using a clamp-less ceramic curling wand (I have the bigger 1 to 1.5" one) because I can't seem to work clamps without leaving crimps in my hair. However, it's a little easier to burn yourself with clamp-less since one hand gets close to the hot barrel (beginners, please be careful and take your time!). Amongst the sea of iron choices, I find that ceramic barrels make a difference and leave my hair visibly shinier than when using metal barrels. I got my very affordable one after reading tons of positive reviews, and have been pretty happy with it thus far!

I use a 400 degree heat setting for my thick hair, but definitely recommend starting out lower, especially if you have fine hair. I usually use drugstore shampoo + conditioner but do splurge on repair / conditioning treatments like this Shu Uemura one, because I feel like I put my hair through so much with regular high heat styling.
beginners wavy hair curling tutorial
Onto the fun topic of lash extensions...after seeing them so often on others (usually identified by gorgeous lashes that look a little too natural too be falsies but a little too striking to be natural), I finally decided to try them out earlier this year. The biggest factor holding me back over the past few years was the fear that they'd damage my real lashes. They also cost a pretty penny - most places I researched in Boston started at $200 to 250+ for an initial full set, with refills at $80-100 every 2-3 weeks. However, I value every minute of sleep in the mornings and it takes me ages to do my lashes, so the convenience and effort saved for me is worth it. It could also be a good option scheduled strategically before a slew of special events, parties, or for a wedding. I've gotten several questions about my "falsies" lately, so figured I'd share some more thoughts on the process!

Before (top) & After (bottom) lash extensions
eyelash extensions befor after lash l'amour boston
Some of my lessons learned in the process:
- The state of your natural lashes will largely dictate how full your extensions can look, since extensions can only be attached to existing lashes. They don't have the same drama as falsies on me, but achieve a look that regular curling and mascara could never get to on my natural lashes. It feels amazing being able to roll out of bed and apply minimal makeup before leaving the house.

- I found this article to be very helpful about the different curvatures, lengths, and widths of lash extensions. My first visit, I didn't know what to ask for so requested shorter extensions (pictured above) but I started getting them a tad longer on the outer half. The biggest difference for me is in the profile view, which I unfortunately don't have a comparison pic of. My natural lashes are stick-straight, short and downward pointing, whereas the extensions are perpetually in an upward curl which look nice from the side.

- Most of the cost is for your technician's time and likely not the lashes themselves. The process is pretty painstaking with 1 extension being adhered to each individual lash. If you get the newer "volume" or Russian-style lashes (lighter and fluffier), they can supposedly apply three or more to 1 lash which will look fuller but take more time & cost. My first full set took about 2 hours and refills are about an hour.

- They're probably not worth getting if you like to regularly take steamy hot showers (may loosen the adhesive) or sleep with your face buried in a pillow. Many a days I've woken up face-down and mourned some smooshed lashes.

- As your natural lashes grow, the extensions will grow with them and get a little longer in the weeks after being applied. When applied right, they should feel just like your natural lashes and not be painful or heavy.

- Lash appointments are the perfect excuse to unwind in the middle of a busy day because your eyes have to stay shut ; ) I used to doze off, jerky leg twitch and all, and embarassingly pretend like I was "stretching." Now I just give in, bid my technician goodnight and enjoy the powernap!

For Boston-area ladies, I've been going to Lash L'Amour on Newbury & in Newton after doing lots of research and Yelp reading. I've been very happy with their service and clean facilities so far. Their prices -albeit not low- are on the lower end of several places I looked into nearby, and a little bonus is they have a free touchup service 1 week after any full set if you want adjustments to be made. They also have a refer-a-friend program, so you can tell them I referred you to get 25% off a first set (I'll get a discount as well on my next appt).

To be honest, I'm still not certain about whether extensions are damaging to natural lashes. I agree with the article above that it likely depends a lot on the care and finesse with which extensions are applied and glued on, not to mention your own maintenance of them. I personally love how they look and the convenience, but am currently taking a break from more refills just to let my natural lashes rest a while before starting up again.

Thursday, June 18, 2015

Easy formal hairstyle tutorials: from voluminous ponytail to romantic pin-curl inspired updo

hair tutorial paris B
From my posts you guys can see I don�t change my hairstyles too often - usually default to either loose waves, a high ponytail, or all my hair piled into a big bun. I love each of these as they can easily transition for special events with a little extra teasing and curling. With wedding season in full swing, I�ve partnered with TRESemm� to show a few easy tutorials for simple but classic dressier hairstyles.

First, I�m showing you guys the steps for one of my favorite looks - the voluminous wrapped ponytail. I also wanted to share a super quick way to transition a ponytail into an elegant updo. This second look is inspired by vintage pin-curl hairstyles, and is a great option for engagement photoshoots, bridesmaids - even glamorous enough for the DIY bride.
DIY hair tutorial loose curls
To start, I like to have a base of loose waves. It does mean some extra time prepping, but is necessary for adding body and will help the hairstyles be easier to "shape." I curl my hair by wrapping it around a 1.5" barrel iron, in an outwards manner away from my face. I finish each curled section individually with TRESemm� Perfectly (un)Done hairspray.
If you typically like using a prepping product like mousse, TRESemm� also makes a Wave Creation Sea Foam in the same collection that can be applied to damp hair and left in as it dries. The foam can be used as a base to make curls light and airy. I absolutely love the Perfectly (un)Done collection for wearing hair down, as the products provide hold but still allow for bounce and movement. The end result here is simply my everyday look. Now, to convert it into a voluminous ponytail...
DIY hair tutorial volume ponytail

For the voluminous ponytail, the key here is to tease both the top of your head pre-pony, as well as the base of the ponytail after you�ve gathered it together with an elastic. Also, Step 3 here is critical for me where you hold the base of the ponytail (where the elastic is) firmly in place with one hand while gently tugging out some hair at the top to get that �poof� at the top of your head.

Each time after teasing or shaping the poof, I apply hairspray to help that section hold. For this look I love TRESemm� Keratin Smooth Frizz-Free Hold hairspray (very affordable at under $5 in stores) which is infused with the same Keratin that you get at salon hair treatments. I especially like it for smoothing away massive wispies all along the sides of my head. A few readers shared the toothbrush on hairspray tip with me years ago, and it's become one of my favorites!

Now, to convert a ponytail into this romantic updo:
DIY hair tutorial vintage pin curl bun updo
The beauty of this hairstyle is the loops don�t need to be uniform or perfect. For an updo like this, I have also been loving TRESemm�s Keratin Smooth collection. The line is designed to control frizz for up to 48 hours which would be especially useful in humid settings like a beach wedding. I�ve used the toothbrush hairspray trick here once again to smooth the sides and lower back areas as much as possible.

For thick, coarser hair like mine, the spin pins are also a necessity for securing down the loops. I find mine at places ranging from the drugstore, to eBay, to most recently the hairpieces aisle at craft stores. I don�t own many hair gadgets, but a teasing brush and a bunch of spin pins are a must for most of my updos!

Thank you to TRESemm� (a product of Unilever) for sponsoring this post. I had a lot of fun making these tutorials, and hope you guys will try them out. Please share photos on FB or tag me on Instagram if you do!

Wednesday, March 4, 2015

Video: How to style a blanket / oversized scarf

how to style tie a blanket scarf 670

As some of you may have seen on Instagram, I've been living in these oversized scarves this winter! I actually shied away from the big square size for a long time thinking it'd overwhelm my frame, but after experiencing how warm they are against the elements I'm not turning back! They've been a key part of my daily commute, and also conveniently serve as a shawl for when the office AC is blasting. Through playing around and trial and error, I've figured out a few favorite ways to style big scarves and have demonstrated them in this video:

All of the styles I'm sharing today start with a square scarf folded in half into a triangle, but you can easily adapt for other shapes as well. A few readers mentioned that to cut down on the volume, they actually took scissors to their scarves and cut the square into two triangles. I personally wouldn't do this because I like the volume for warmth (and also the raw cut edge might unravel), but just wanted to pass along this idea...

This has been my personal favorite style - variation #2 of the "handkerchief" in my video:blanketscarf

And the easiest way - variation #1 of the "handkerchief" from my video:
blue check scarf
Which is your favorite styling method shown? : )

Sunday, December 28, 2014

Tutorials: DIY shoe clips + no-sewing needed clutch purse

Last week I had a fun opportunity to be on Meredith Vieira's talk show sharing a few fashion DIYs for Christmas. I know it's past Christmas, but I love a good at-home project any time of the year! These two were my favorites and are easy enough for the craft-challenged and even for doing with kids. For anyone interested, I included a recording from the TV segment at the bottom of this post.
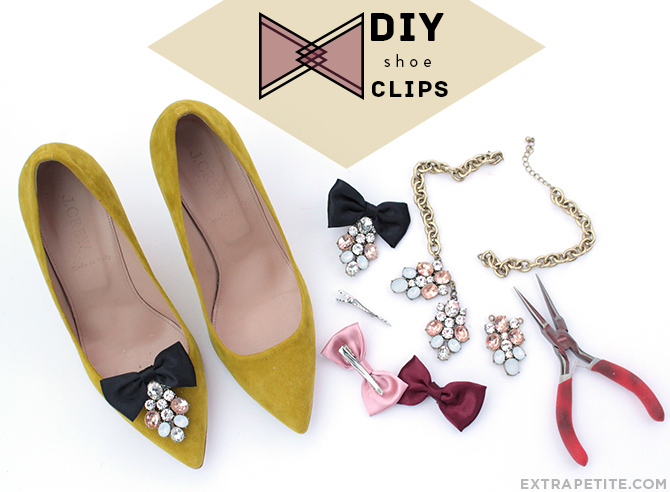
DIY shoe clips tutorial header
DIY # 1 - I first came across the concept of shoe clips with my vintage bow ones from eBay, and soon realized how easy they were to make. Apparently in the olden days these were pretty common, and I don't understand why they're no longer popular! You can easily change up the look of plain shoes or mix and match designs to your heart's desire. The clips can go on the front part of the shoe, the back behind the heel, on the side, on the ankle strap, etc...quite a few possibilities.
DIY sequin clutch header
DIY # 2 - The other item the show producers asked me to demonstrate was a clutch purse, which I posted a tutorial of here (one of my favorite creations ever). However they asked me to simplify it even further so that no sewing was needed, since Meredith is apparently not so great with needle and thread. I scrounged around at home and found an old vinyl makeup pouch and fabric glue, which surprisingly helped create a pretty nice-looking bag. For anyone who owns a sewing machine though, I would encourage sewing based on my old tutorial instead of using glue, since stitches will be more secure over time.

On to the steps for the shoe clips..

Shoe clips materials needed: 
1. Glue. If you don't own a hot glue gun yet, it's a useful little thing to have around for crafts plus is very inexpensive (under $10, especially with those craft store 40% - 50% off coupons). I used one here but if you want it to be really secure, super glue should work - just be very careful.

2. Embellishments. The best part about these is you can use a wide variety of items, such as costume jewelry, old hair bows, over-sized earrings that might be too heavy for your earlobes, etc.

3. Clips. There are blank shoe clips made specifically for this purpose. I took alligator clips from the back of old hairbows since i needed a bigger clip for my large pieces of jewels. NOTE: use smooth clips without jagged teeth to avoid leaving any marks on delicate shoes. I didn't have time to find or buy smooth clips for the show or these photos, but they're pretty easy to find either on old clips or at craft stores. You can also try lining the jagged side with small pieces of felt so that they don't dig into the shoes as much.

Step 1 - remove jewels or bows from their original attachments. I used thin metal pliers (super nifty for repairing costume jewelry) to detach a few gem clusters from this inexpensive Forever 21 necklace, and also snipped off the bows and clip backings from old hair accessories.
DIY shoe clips tutorial 1
Step 2 - If you're using longer clips, use pliers to gently bend the clips into a shape that would lie flat on a shoe surface and feel comfortable up against your foot. These were originally in a curved shape, which I straightened out and then bent the handle grip a bit so it wouldn't dig into my feet. *Remember not to use clips with jagged teeth on delicate shoes**
DIY shoe clips tutorial 4
Step 3 - Generously apply glue to the back of the embellishments and press the clip down firmly until glue is set. I did the gems here first, which would look great alone on shoes, but added the bows for a little something extra.
DIY shoe clips tutorial 3
Here's what the backsides look like post-gluing. My gems here were pretty heavy and I didn't have a lot of time for the glue to set, so I added thin wiring as extra reinforcement in hopes that they wouldn't tumble off during the show.
DIY shoe clips tutorial 2
And that's it! Can't wait to try these clipped on some pointy-toe flats. Here's a few ideas on how to style your clips. I actually wonder why most designer statement shoes don't come with the embellishment as removable for greater versatility.


They also look cute boxed up for gifting!
DIY shoe clips tutorial 5

Next, the DIY no-sewing clutch purse...

Clutch purse materials needed:
1. Fabric. You can purchase scrap fabric on eBay, at fabric stores, or look in your closet or thrift store for old garments made of interesting materials. I'm using a sequin tank top that was so old the fabric lost its elasticity, but made for perfect clutch-making material.

2. Pouch with zipper or sliding closure. You can use an unwanted makeup pouch (mine was from Forever 21 and is still available), pencil pouch, etc. If you are doing a sewing version and your fabric is too floppy to hold a clutch shape on its own, insert a similar pouch inside your finished product to add structure.

3. Glue. I used "fabric fusion" which I had at home, but other types of glue might work similarly.

4. Clips or clamps. I like binder clips for their strong hold.

Step 1: Starting with one side, apply glue to the top of the pouch in a straight line across, right below the zipper. Line up a straight edge of your material and press down. Continue applying glue to the edges and center of the pouch surface and pressing your fabric down a section at a time.
DIY sequin clutch 1
Step 2 - turn the pouch around - this is side #2. Trim fabric so that it's enough to fold over the entire pouch but with an inch or two of material to spare on both the left, right, and upper edge (below the zipper) of the pouch. Fold those sides in so that no raw edges will show on the end result. Apologies for my poorly-trimmed fabric, as I was in a rush.DIY sequin clutch 2Step 3 - Apply more glue along the edges and center on side # 2. Press down the remaining fabric and clamp down with binder clips all around the perimeter. Allow everything to dry overnight, clamped in place.
DIY sequin clutch 3Ta-da! Here's the finished product from my last outfit post:
anthropologie petites floral dress 2
Here's a short video from the episode (my segment begins about 2 minutes in). Their producers reached out just a few days before the show taping, which was in front of a live audience to be aired later in the week. I was so swamped with work my initial reaction was to pass, but am glad I made time for it - my segment was short, but the highlight of the trip was having a dressing room directly across from Justin Timberlake and watching him roam around. Unfortunately I was too busy trying to contain squeals of excitement to ask him for a photo together!

And alternate link here if the video above doesn't work. I know you guys are probably sick of the bridesmaid dress re-styling from this post but they really wanted me to show it, and also provided the dress that I had on. The glitter heel trick was one of the producers' idea, which they instructed me on to demo along with the shoe clips. Hope you guys have fun with these projects!