**Sale update: everything is at least 40% off this weekend at Ann Taylor, including my swing trench (fully restocked in both navy and cream!) reviewed here and piped sheath dress reviewed here. Both are made of thicker materials and nice quality, and currently available in all petite sizes!**
I'm a bit clueless about the video function on our camera, and Nick's heavy sighs when I ask him to be "cameraman" (esp. when Sunday sports are on) sums up his thoughts on that topic! He "gifted" me a point-and-shoot camcorder which I took as a blatant hint. I've gotten several requests for a Prada Saffiano Cuir bag review, so figured why not test my new gadget out. Turns out I didn't record half the footage I thought I did, instead filming several close-up nostril shots of me adjusting the camera...sigh! If you want to see the various ways you can wear these bags with the adjustable shoulder strap, you can check out my older video review of the Saffiano Lux (also known as the "Galleria" line).
^ Press Play
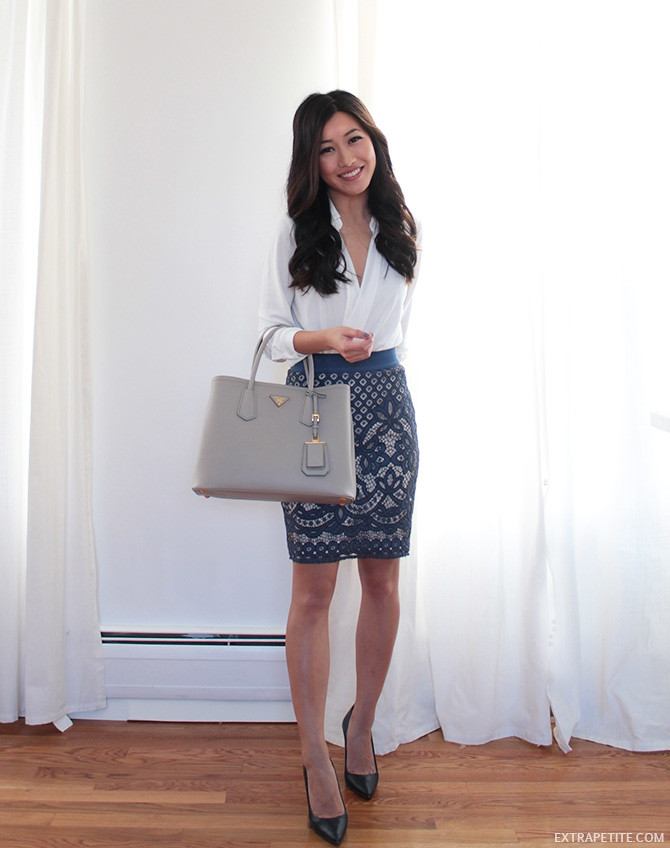
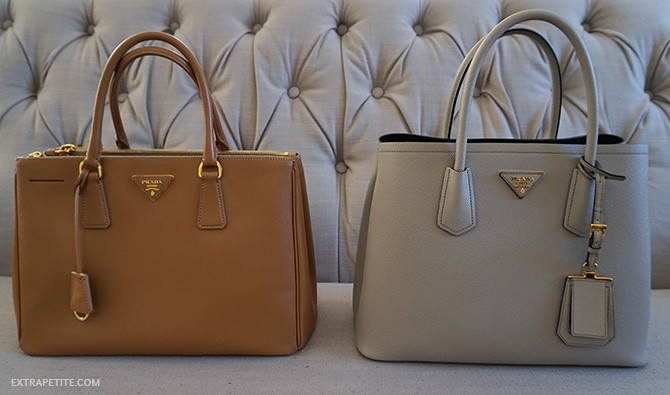
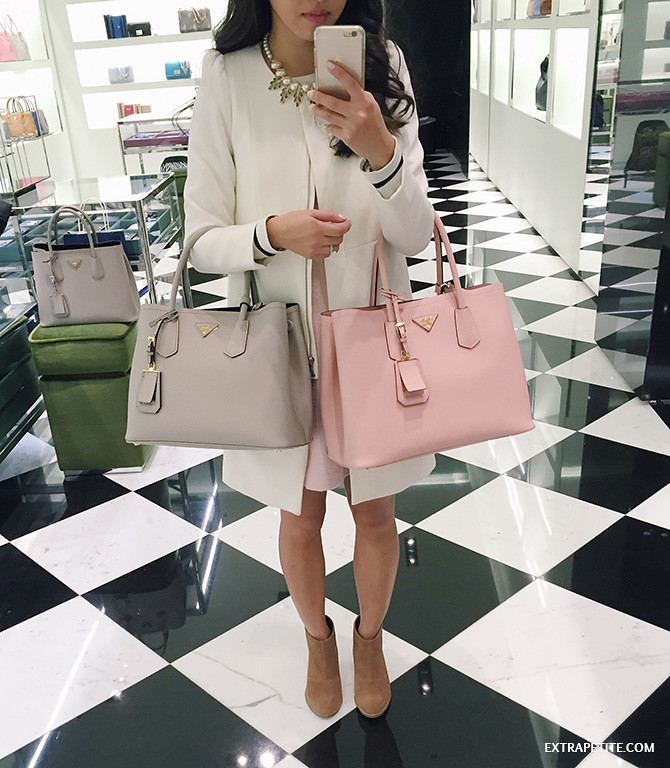
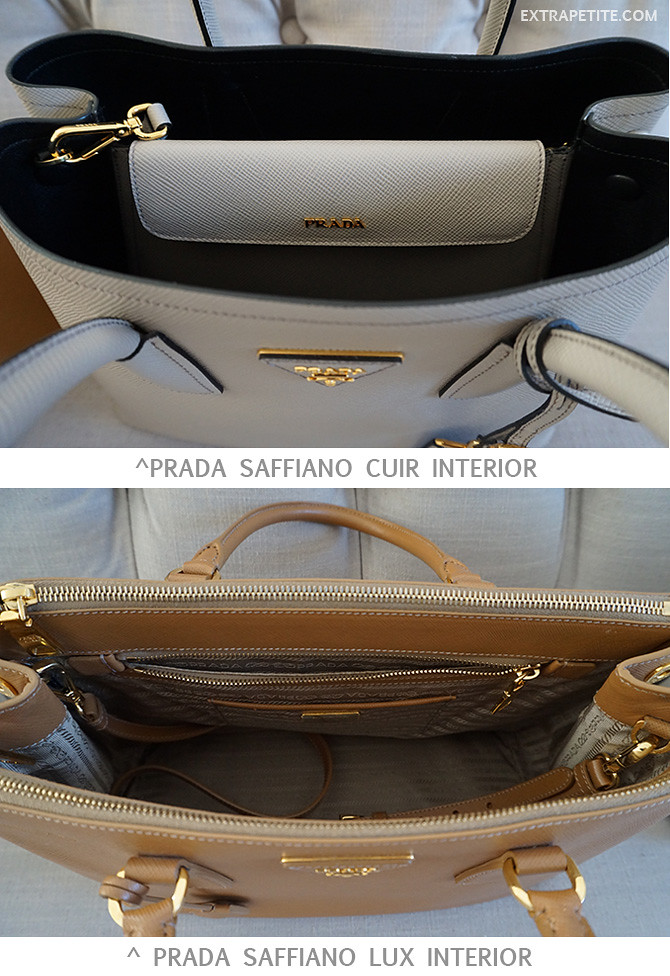
Prada's Cuir double bag is a gorgeous & sturdy-feeling one, and has quickly become one of my most-worn handbags (see on me here, here, and here just to name a few). The Cuir line came out about two years ago, and the lack of information about it online can frustrating for researchers. For this video, I called a bunch of Prada boutiques around the country asking the same questions ... what is "saffiano" leather, what's the difference between the Saffiano Lux and Saffiano Cuircollections, and how to care for the material. The responses I got from sales associates ranged from completely clueless, to finally enthusiastic and knowledgeable-sounding (thanks Joel from the boutique at the Bellagio in Vegas : ) Biggest edit from video: while in a Prada boutique I was told my bag is called the "medium" size, and the bigger one is "large." Please see below for a comparison of my gray bag versus the bigger pink one. However, I just checked the exact webpage where I ordered my bag from at Neimans and it's listed as as "small" there. Saks also refers to this size as the "small," and both retailers refer to the bigger size as "medium." I also want to clarify from the video that when I said soap, I meant I was told to use soap with a little water on a cloth or paper towel to clean stains, making sure to wipe the area dry afterwards. I've never had to use soap, though, as usually just a little water on a napkin removes whatever surface stain or mark I've made on these bags.
Closeup of the two different saffiano textures
Side views of the two medium sizes < Lux vs. Cuir>
As mentioned in my review, I'd love to hear any other requests for future videos!
'Tis the season for doing DIY projects at home! It took me a little while but per your requests, here's a tutorial for the DIY blusher birdcage veil and embellished sash belt I wore on our wedding day. You can also make thinner versions of the sash belt with smaller pieces of appliqu� to dress up bridesmaid looks. For those not in wedding mode, perhaps try your hand at one of my tutorials for a holiday tulle skirt, a regular A-line skirt, or a foldover clutch using festive materials!
I made my own bridal accessories in order to get exactly what I needed (my gown was a slightly hard-to-match champagne color), and ended up saving quite a bit in doing so. The belt is so easy it doesn't even warrant a tutorial! The veil will require a little patience, but I still think it's suitable for beginners with little to no sewing experience. I considered a variety of veils and went with birdcage for the vintage-inspired look, and also because the simplicity balanced out the volume of my gown.
I also re-wore both of these accessories with my reception look:
I've listed where I got all of my materials at the bottom of this post, but you should be able to find similar at any of your local fabric or craft stores.
And of course the only clear closeup photo I found of both accessories is this goofy shot with our mini ice cream cones : )
Belt Supplies:
- Ribbon or material of your choice for the sash. I used a 1.5" wide grosgrain ribbon cut to about 100" long (I liked long tails for draping over the back of my dress)
- A piece of embellished appliqu�. Lots to choose from if you search online! Mine is a 7" long iron-on one from The Bright Shop - the exact one is no longer available, but she mentioned a super similar one will be in stock when her shop re-opens in early January. You can go for a longer appliqu� to cover more of your waistline (I wanted to do this but ran out of time to order more appliqu�), or arrange together several smaller pieces. - Clear nail polish
- Iron & ironing board, and/or needle & thread
Veil Supplies:
- A small haircomb - these come in either plastic or wire
- 1 yard of Russian veil netting. I got 1 yard of the 9" wide champagne color from Benoir's Closet to match my gown. She also sells white, ivory, and several other colors.
- Needle & thread
There are actually several places on Etsy or eBay to order an inexpensive birdcage / blusher veil already made - however, I bought one and it arrived in the mail so misshapen that I couldn't revive it despite my best steaming and ironing efforts. Making one ensured that the poof would be nicely shaped, plus you can use wider or narrower netting if you want to customize more or less coverage on your face.
I had my florist create a floral comb with fresh flowers (here's my simplified tutorial) which I layered on top of my birdcage veil comb. This helped conceal any rough edges from my DIY work, and also dressed the piece up more. Please feel free to share this with any friends getting married, and please let me know if you end up trying it yourself!
For today's post I wanted to share an updated hair curling tutorial, and also answer some of your questions on eyelash extensions (scroll down below)! After experimenting quite a bit with hair curling over the years, this video shows my current routine for my everyday hair. And for special occasions, I've been too lazy for updos lately so usually just secure curled hair off to the side and add some "poof" up top. What I forgot to mention in the video is that as an alternative look after bobby-pinning the top poof, you can twist all the curled hair into a low side bun and secure with spin pins to get the simple look I wore here - I like that one to show off garments with special back detailing. I'm using a clamp-less ceramic curling wand (I have the bigger 1 to 1.5" one) because I can't seem to work clamps without leaving crimps in my hair. However, it's a little easier to burn yourself with clamp-less since one hand gets close to the hot barrel (beginners, please be careful and take your time!). Amongst the sea of iron choices, I find that ceramic barrels make a difference and leave my hair visibly shinier than when using metal barrels. I got my very affordable one after reading tons of positive reviews, and have been pretty happy with it thus far! I use a 400 degree heat setting for my thick hair, but definitely recommend starting out lower, especially if you have fine hair. I usually use drugstore shampoo + conditioner but do splurge on repair / conditioning treatments like this Shu Uemura one, because I feel like I put my hair through so much with regular high heat styling. Onto the fun topic of lash extensions...after seeing them so often on others (usually identified by gorgeous lashes that look a little too natural too be falsies but a little too striking to be natural), I finally decided to try them out earlier this year. The biggest factor holding me back over the past few years was the fear that they'd damage my real lashes. They also cost a pretty penny - most places I researched in Boston started at $200 to 250+ for an initial full set, with refills at $80-100 every 2-3 weeks. However, I value every minute of sleep in the mornings and it takes me ages to do my lashes, so the convenience and effort saved for me is worth it. It could also be a good option scheduled strategically before a slew of special events, parties, or for a wedding. I've gotten several questions about my "falsies" lately, so figured I'd share some more thoughts on the process!
Before (top) & After (bottom) lash extensions
Some of my lessons learned in the process: - The state of your natural lashes will largely dictate how full your extensions can look, since extensions can only be attached to existing lashes. They don't have the same drama as falsies on me, but achieve a look that regular curling and mascara could never get to on my natural lashes. It feels amazing being able to roll out of bed and apply minimal makeup before leaving the house.
- I found this article to be very helpful about the different curvatures, lengths, and widths of lash extensions. My first visit, I didn't know what to ask for so requested shorter extensions (pictured above) but I started getting them a tad longer on the outer half. The biggest difference for me is in the profile view, which I unfortunately don't have a comparison pic of. My natural lashes are stick-straight, short and downward pointing, whereas the extensions are perpetually in an upward curl which look nice from the side.
- Most of the cost is for your technician's time and likely not the lashes themselves. The process is pretty painstaking with 1 extension being adhered to each individual lash. If you get the newer "volume" or Russian-style lashes (lighter and fluffier), they can supposedly apply three or more to 1 lash which will look fuller but take more time & cost. My first full set took about 2 hours and refills are about an hour.
- They're probably not worth getting if you like to regularly take steamy hot showers (may loosen the adhesive) or sleep with your face buried in a pillow. Many a days I've woken up face-down and mourned some smooshed lashes.
- As your natural lashes grow, the extensions will grow with them and get a little longer in the weeks after being applied. When applied right, they should feel just like your natural lashes and not be painful or heavy.
- Lash appointments are the perfect excuse to unwind in the middle of a busy day because your eyes have to stay shut ; ) I used to doze off, jerky leg twitch and all, and embarassingly pretend like I was "stretching." Now I just give in, bid my technician goodnight and enjoy the powernap!
For Boston-area ladies, I've been going to Lash L'Amour on Newbury & in Newton after doing lots of research and Yelp reading. I've been very happy with their service and clean facilities so far. Their prices -albeit not low- are on the lower end of several places I looked into nearby, and a little bonus is they have a free touchup service 1 week after any full set if you want adjustments to be made. They also have a refer-a-friend program, so you can tell them I referred you to get 25% off a first set (I'll get a discount as well on my next appt).
To be honest, I'm still not certain about whether extensions are damaging to natural lashes. I agree with the article above that it likely depends a lot on the care and finesse with which extensions are applied and glued on, not to mention your own maintenance of them. I personally love how they look and the convenience, but am currently taking a break from more refills just to let my natural lashes rest a while before starting up again.
As some of you may have seen on Instagram, I've been living in these oversized scarves this winter! I actually shied away from the big square size for a long time thinking it'd overwhelm my frame, but after experiencing how warm they are against the elements I'm not turning back! They've been a key part of my daily commute, and also conveniently serve as a shawl for when the office AC is blasting. Through playing around and trial and error, I've figured out a few favorite ways to style big scarves and have demonstrated them in this video:
All of the styles I'm sharing today start with a square scarf folded in half into a triangle, but you can easily adapt for other shapes as well. A few readers mentioned that to cut down on the volume, they actually took scissors to their scarves and cut the square into two triangles. I personally wouldn't do this because I like the volume for warmth (and also the raw cut edge might unravel), but just wanted to pass along this idea...
This has been my personal favorite style - variation #2 of the "handkerchief" in my video:
And the easiest way - variation #1 of the "handkerchief" from my video: